Showing posts with label Cauliflower. Show all posts

November 15, 2016

[VeganMoFo 2016] My Mother's Simply Fried Cauliflower Recipe


Every time I make these Simply Fried Cauliflower florets at home, I think of my mother and her cooking. Our favorite to this day, it is simply amazing how she used to deep fry almost everything without a drop of excess oil. There were times when we were kids - me & my sister used to just gobble right out of the frying pan. Especially on rainy days and Saturdays, these were an absolute must-make dish in our household. The ritual continued until I charted out to a far away land for my higher studies. Now, living worlds apart from her, I crave for her reassuring words during times of distress and most of all her comforting food. Amma, this post like many others on this blog is dedicated to you. I love you. I miss you. 

My Mother's Simply Fried Cauliflower Recipe

April 21, 2015

[Recipe Redux] Tandoori Gobi | Oven-Roasted Cauliflower with Tandoori Masala


Out of all the vegetables I like, Cauliflower is my most favorite. I sneakily add it to my pastas, stuff into my bread, simply fry it and even use it as a substitute for an authentic meat dish. Today's recipe 'Oven Roasted Cauliflower with Tandoori Masala' too is an adaptation of Melissa Clark's popular recipe which I already made it for the blog. When done right, I believe there is nothing that beats a humble cauliflower dish. So, when the awesome people at Recipe Redux gave 'Spring Cleaning' as a theme for this month, I raided my pantry for a condiment I hardly used before (Tandoori Masala, which I got in the goodie bag of IFBM 2014), grabbed a cauliflower (I always have one in my fridge), tossed everything with good olive oil and let the magic happen. Except for the few stirs in between while the veggies are roasting, there is not much to do for this dish. Yet, when served hot, it will amaze you on how incredibly flavorful it is. :-) 

Oven-Roasted Cauliflower with Tandoori Masala

November 18, 2013

Penne with Harissa Roasted Cauliflower, Tomatoes, Carrot Strips and Capers


Pasta Lovers, Rejoice. I think today's recipe will make your mouths water (just like mine) and urge you to go for a second serving. I was so mighty happy with the results that I just couldn't wait to share it with you all.


This spicy pasta was made for a long lost childhood friend, whom I was meeting after many years. It was pure fun to catch up what we had missed all this while and a foodie herself, the conversation inadvertently moved on to cuisines we tried, recipes (her latest find - Spaghetti carbonara with Quorn) and favorite restaurants in town etc etc. Out of the blue, she exclaims"Are you still a vegetarian?" quite surprised. Her expression was quite remarkable as if I have had survived through a huge tornedo. "Yes!" I replied firmly, quite annoyed at the stern objectivity of the question.

The tiff between the likes of vegetarians and non vegetarians is age old. The meat lovers wonder what do vegetarians eat and we wonder how can they simply relish food which involves butchering an innocent animal. So many times I have been asked politely and directly if I was a vegetarian by choice or did someone force me into it. I find that question very amusing as I never asked them the same question. It is just the way I am I say to avoid any further inquiries. If they really persist, irritated ofcourse I casually give the blog links of mine and a bunch of others to prove my point that we, vegetarians indeed eat delicious, healthy food with pleasure and relish them without any guilt. :-)


In the beginning of my post, I promised to share my pasta experiment of mine. Haven't I? Without further ranting about veg vs non-veg ( which can just go-on), let just dive into its details, so that you can make some too. Shall we?


Thanksgiving is around the corner. Probably you can make some harissa pasta for your vegetarian friends. The vegetables can be roasted well in advance and stored in refrigerator. On the day, all you have to do is cook pasta, toss these vegetables and capers in olive oil and Serve! Enjoy.


Penne with Harissa Roasted Cauliflower, Tomatoes, Carrot Strips and Capers

Make Time: 45 mins
Serves 3 to 4

Ingredients:

1/2 pound dried penne pasta (or any other pasta)
2 tbsp harissa paste
1/2 cup olive oil
1/2 tsp black pepper powder
salt - to taste
1-2 tbsp of pickled capers, drained
1 cup cut cauliflower
2 red bell peppers, deseeded and cut into strips
2 tomatoes, chopped
1 carrot, peeled, cut into thin strips
chopped coriander leaves

Preparation:

In a small bowl, whisk together harissa paste, 1/4 cup of olive oil, salt and black pepper powder. Keep aside.

Preheat oven to 180 C or 400 F. On a baking sheet, spread cauliflower florets, bell peppers, carrot strips, chopped tomatoes and corainder leaves. Top with the harissa dressing and toss so that the veggies are evenly coated. Bake for about 25 to 30 mins until they lightly crispy.

Cook pasta in lots of salted boiling water as per package instructions or until al dente.

Heat few tbsp of olive oil in pan and toss together roasted veggies, capers with penne. Adjust seasoning with salt and pepper. If you want to increase the heat, optionally add little harissa to pasta. Cook for 4 to 5 mins. Serve and garnish with fresh herbs and cheese (if you wish to).


[Updated - 24th November 2103] - On a special request from my little sister, I made a few boxes of this pasta for her family. :-) Tried the same recipe with Farfalle (bow-tie pasta) as well (pic of the left) and it turned out great.


This is Recipe 64 added to 2013 Recipe Archive. Check out the rest of the recipes too.

**********************************************

Did you like what you just read. then Subscribe to Cooking With Siri feed  (OR)

Enter your email address and Never miss a post..


Delivered by FeedBurner

Be the first one to know what I am going to post next by "Liking" Cooking With Siri page on Facebook and follow me on twitter.

until next recipe,


August 14, 2012

Simplicity at its Best - {Recipe} Roasted Cauliflower with Whole Cumin Seeds

 
Each one of us has a favorite vegetable. Ofcourse they change over time and as we get introduced to new textures & flavors. But, for me it was always - Cauliflower, my first love which am sure will be likewise in future as well. I usually make a tomato + cauliflower dry curry with minimal spices at every opportunity. Since we had some sporadic gloomy days some time ago, I wanted to a pretext to turn on my oven so that its heat can cheer me up a bit.

Other recipes using CauliflowerVegetarian Rogan Josh (with Cauliflower & Tofu)Cauliflower (Gobi) ParathaVegan Christmas Tree Pie, Fried Cauliflower

Roasted Cauliflower with Whole Cumin Seeds
I also was not in a mood to whip, cream and bake something elaborate like cookies or cakes. A sudden whim and I remembered reading about this recipe on Melissa Clark's blog (one of my favorite food writers). A simple toss with olive oil and cumin seeds, roast until crispy and there you have a delicious bowl of roasted cauliflower which is so darn addictive that it took exactly 3 minutes, literally for me and my sister to finish it off in entirety. :-)


{Recipe} Roasted Cauliflower with Whole Cumin Seeds

Recipe idea from Melissa Clark

It is versatile enough to be great as a side dish or just as a snack with an unbeatable combo of flavor and texture. Add whatever you have in hand.  I am planning to add herbs and nuts next time around. For an indianized version, sprinkle some chat masala once out of the oven. For some cheesy goodness, one can also sprinkle grated cheese in last few minutes of roasting.

Ingredients:

1 medium sized cauliflower, cut into florets
olive oil (about 1/2 cup)
generous pinch of cumin seeds (jeera)
salt & pepper


Preparation:


1. Preheat oven to 425F or 220 C.

2. In a mixing bowl, add lots of olive oil with cumin seeds. Toss the cauliflower florets until evenly coated. Sprinkle salt and freshly ground black pepper.

3. Spread the florets on a baking sheet evenly and roast for 20 to 30 minutes, stirring once or twice for even toasting and caramelization.


Cauliflower florets

Just out of the oven..

Serve with hot sauce like I did or toss/sprinkle cool yogurt/curd with herbs on the top.

I could just manage to save this little bunch for the picture. Rest was all gone by then! :-)

For more such simple yet delicious recipes, Check out the Recipe Index featuring more than 200 posts .

until next time,


Did you like what you just read. then Subscribe to Cooking With Siri feed  (OR)

Enter your email address and Never miss a post..


Delivered by FeedBurner

Be the first one to know what I am going to post next by "Liking" Cooking With Siri page on Facebook and follow me on twitter.


December 20, 2011

Holiday Special: Vegan Christmas Tree Pie

"When Christmas bells are swinging above the fields of snow, we hear sweet voices ringing from lands of long ago, and etched on vacant places are half-forgotten faces of friends we used to cherish, and loves we used to know."  

~ Ella Wheeler Wilcox (American poet and writer 1850-1919)

The one place that reminds me when I think of Christmas and Snow together is - New York City. As a first-timer in 2007, I was mesmerized by its energy and sheer liveliness in almost every street. If you are one of them, who took long walks on Fifth Avenue, tightly hugging your snow coat with hood & woollen mittens on, strolling near almost every shop's window, while its slightly snowing, then you know what I am talking about. :-)

Food, if you wanna talk about that, then we can go on-and-on for hours and never get tired. Such is the vibrancy of NYC which is so infectious and many vivid memories are etched in hearts & minds of everybody who visits there.

Make holidays fun by baking these cute Vegan Christmas Tree Pies
Today's recipe is dedicated to the big Christmas Tree Lighting ceremony that happens every year near Rockefeller Centre, which marks the beginning of the holiday season and personally for me, it symbolizes how happy & fun holidays are..The tree, traditionally a Norway Spruce, is illuminated by 30,000 environmentally friendly LED lights on five miles of wire, and crowned by a Swarovski crystal star. :-)

..miss you New York City.. I hope we meet sometime, real soon!

Santa is here...to fulfil all our wishes..


Step 1: Roll a dough ball into almost a square. Fold opposite sides towards the centre to create a rough mark. 

Step 2: Fold sides back and make cuts perpendicular to the mark, as shown in the picture above.

Step 3: Place some filling in the centre area. 

Step 4: Start folding the strips alternatively from the top, until the very end..

Finally, it would look like this - a Christmas Tree Pie is ready to go into the oven..

Pie Filling - Cauliflower, Potato, Peas with Indian spices.

Perfect for potlucks, parties and these are so much fun to make for family & friends..

Christmas Tree Pie..cut open..


{Recipe} Vegan Christmas Tree Pie

Adapted from Veganlovlie

Ingredients:

For the pie crust:

all-purpose flour, 2 cups
canola oil, 4.5 tbsp
water, 5-6 tbsp (to form a soft, non-sticky dough)

For the filling:

cauliflower florets, thinly sliced, 2 cups
potatoes, cut into small cubes, 1 cup
(fresh/frozen) green peas, 1/2 cup
onion, 1 small, finely chopped
tomato, 1 small, finely chopped
garlic clove, 1 or 2, finely minced
turmeric, 1/4 tsp
salt, to taste (Note: Add a little less salt as the pie crust is already salted)
coriander powder, 1 tsp
red chilli powder, 1/2 tsp
olive oil, 2 tsp
soymilk with a pinch of turmeric, for glazing

Preparation:

To make the dough:

Mix oil into the flour and mix in with fingers until it look more like fine breadcrumbs. Then slowly add water, little by little and knead to form a smooth, non-sticky dough. Divide into 3 balls.

To make the filling:

1. Heat oil in a pan on a low-medium heat and add onions & garlic. Cook until translucent and raw smell goes away.

2. Add potatoes and cook them half-way through. Next add cauliflower. Mix in and cook until slightly tender.

3. Add peas. At any stage, don't add any water. The filling has to dry, so that you don't end up with soggy pies..

4. Add tomatoes. Stir and mix well.

5. Season with salt, turmeric, red chilli powder and coriander powder. Cook for couple of more minutes.

6. Allow to cool the filling completely.

Assemble -

1. As per the photographs above, roll, cut and fill the pies.

2. Preheat oven to 180 C (350 F)

3. Place the pies on a greased baking sheet and brush with some (soymilk + turmeric) mixture.

4. Bake for 30-40 mins until light golden colour. Serve and enjoy..

Note: If you are feeling too lazy to make the pie crust, then use store-bought puff pastry, thaw and follow the same procedure.


Happy Holidays everybody..:-)

until next time,


Did you like what you just read. then Subscribe to Cooking With Siri feed  (OR)

Enter your email address and Never miss a post


Delivered by FeedBurner

Be the first one to know what I am going to post next by "Liking" Cooking With Siri page on Facebook and follow me on twitter.

July 3, 2011

Vegetarian Rogan Josh (with Cauliflower & Tofu) and Rice Cooker Biryani

"Being a Vegetarian", Is it tough? How do you manage?

How can you NOT have meat?

Don't you crave for some?

You don't eat meat, but watch Food Network?

Oh! You are that ghass-poos types?

C'mom people, especially the meat-eating ones. Stop judging the vegetarians. If we, vegetarians can  be laid back and are non judgmental about your eating habits, then why are you?

Did you know what a guy called Neal Barnard once said -

"..The beef industry has contributed to more American deaths than all the wars of this century, all natural disasters, and all automobile accidents combined.  If beef is your idea of "real food for real people" you'd better live real close to a real good hospital..."... Yep, its true!

Ok, there I settled score with all of my meat-loving friends, who keep teasing me or questioning about my vegetarianism. It is choice of living I love, and No, I don't crave or would secretly wish, I was like you. :-)

I am not here to rant and start a debate or to promote that vegetarianism is better. I am just saying - One is free to choose what to eat and what not to eat. Don't be judgmental. Live & Let Live.

Now, shall we move on to today's post in "Free Spirit Blogging". and this month my dear blogging pal, DK chose the theme. Here are some basic cues -

1. The challenge is to take a classic (or famous) Non Vegetarian dish and give it a Vegetarian interpretation.

2. The final dish should look as close as possible to its Non vegetarian counterpart.

3. If you can also make the texture/taste similar then it would be awesome, although its purely optional.

3. Usage of store bought Mock meats (or mock anything) is not allowed.


I chose to make a classic, non vegetarian recipe called - "Rogan Josh", normally made with mutton and gave a vegetarian twist with tofu and cauliflower. I went with these two as the recipe involved marinating the meat and tofu & cauliflower have a tendency to absorb such flavors very well.


Vegetarian Rogan Josh (with Cauliflower & Tofu)

Sandeepa's Trivia: Rogan means oil in Persian, while Josh means heat, hot, boiling, or passionate. Rogan josh thus means cooked in oil at intense heat. Another interpretation of the name rogan josh is derived from the word rogan meaning color and josh meaning passion, hot or red. It is originally a classic meat dish which is red in color. I have used a tad bit less chilli as I was serving this for my cousin-brother who doesn't eat a lot of heat. Next time, I am gonna try for that authentic "red" color.


I have adapted this recipe from Bong Mom's Cookbook - Mutton Rogan Josh. Since I was working with Tofu and Cauliflower, which are very bland in taste as-is, I added some more spices in the marinade. The ingredients-list is effectively the same, it is just that I used them in a different order :-). Also, my version was a little on a dry-side. Simmer it in little more water would make this gravy-based.

Ingredients:

200 gms of tofu (I got mine from M K Ahmed, Bangalore - Ka Kim's variety)
1 medium cauliflower, washed and cut into florets.

For the marinade:

2 tsp ginger garlic paste
1 tsp ground cumin powder (jeera powder)
1/2 tsp turmeric (haldi)
1 tsp coriander powder (dhania powder)
salt - to taste 
1/4 cup of water

For tempering

1 tsp butter
2 medium sized onions, chopped
3 tbsp oil
1 bayleaf (tej patta)
2 cardamom pods (green ones), crushed
2-3 cloves (laung)
1 inch cinnamon stick (dalchini)
1/2 tsp pepper powder
1/2 tsp fennel powder
1 tsp chilli powder (The original recipe asked for Kashmiri Mirch, which enhances the red color. I didn't have any on hand, so used normal red chilli powder)
1/4 tsp garam masala
1/2 cup beaten yogurt

Preparation:
Dry Fry Tofu: Dry frying is one way to prepare tofu to remove the moisture and  in turn helping it to soak up the flavors of a marinade or sauce. One important thing to remember is to use a well drained tofu with a non-stick pan. (Source)


Place the tofu on a cutting board and a bowl with half filled water on it (for 10-15 mins). Make sure the pressure is not too much which can crumble the tofu. Cut them into small chunks (as shown below). Heat a non stick pan on medium heat. Once hot, place the tofu chunks on it. No oil required. Remember, we are just dry frying. Occasionally, keep turning the sides so that it is evenly, lightly browned.


Prepare the Marinade: In a bowl, mix ginger garlic paste, ground cumin, turmeric, coriander powder with salt and water. Whisk the contents well. Divide the marinade into two separate bowls and put the tofu pieces into one and cauliflower florets into the other. Carefully, mix so that sauce coats them properly.

Cover and Refrigerate it for at least 2 hours.


After about an hour and half into marination, you can start the following steps.

Melt butter in a kadai and add chopped onions to it. Sauté until thoroughly browned. This adds significant flavor to the dish. Please be patient and don’t skim on the sauté time. :-) Cool down a bit and grind into a smooth paste. Keep aside.

Heat oil in the same kadai and add bayleaf, cloves and cinnamon. Once it starts to sizzle, add fried onion paste. Next comes the dry spices - fennel powder, pepper powder and chillo powder. Add a little water and fry the masala until oil separates. 
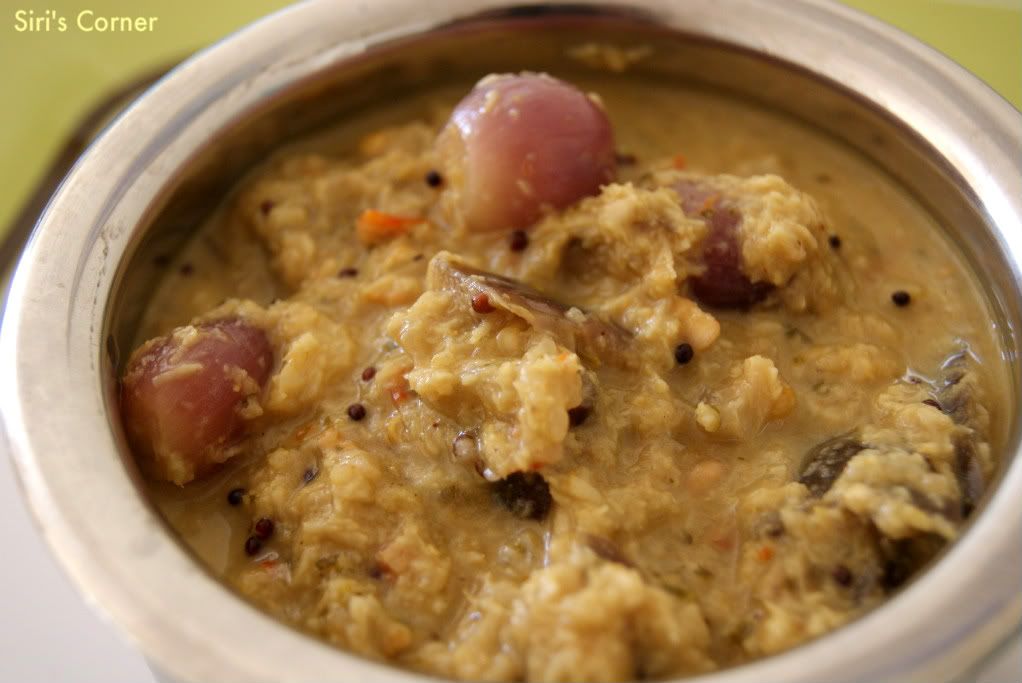
Next add marinated tofu and cauliflower florets. Mix well, lower the heat, add the yogurt little by little, mixing in the middle. Let it simmer for 1 min. Add 1-2 cups of water and adjust salt and spices if necessary. Cover and cook on low heat, giving it a careful stir for every 5 mins until the cauliflower florets are fully cooked.

Finally, sprinkle some garam masala and it is ready to serve.

You ask, what to serve with? Hmmmm, how about I share a very very simple biryani that can be made in a rice cooker.


Rice Cooker Vegetable Biryani

I end up making this biryani (which I learnt from my mom) atleast once in a week with a spicy gravy dish on the side, just for the fact that it is so easy to make.


Ingredients:

2 cups of Basmati Rice. (Sona masoori variety is fine too)
3 cups of water
few mint leaves
1 cup mixed vegetables. (I used frozen - a combo of peas, cauliflower, tiny carrot pieces and beans)
salt to taste
3 tsp oil
1/2 tsp ginger garlic paste
1 bayleaf
1 tsp garam masala

Preparation:

Wash rice and drain water, completely. Keep aside.

Heat oil in a kadai, add bay leaf, ginger garlic paste and mint leaves. When it starts to sizzle a bit, add the mixed veggies. Saute them for 4-5 mins. Add the salt & garam masala. Finally the rice and Mix once or twice.


Empty the contents of the kadai into a rice cooker. Add 3 cups of water. (rice:water ratio - 1:1.5). Cover and cook until it shifts to - "Keep Warm". 

Isn't it one easy-peasy recipe? Just stick to the rice to water ratio - to not to end up a sticky biryani..


Here is what other FSB member have cooked for you -

Anu - Sweet and Spicy Orange Paneer

Hope you all have a wonderful week ahead.

until next time,
Siri

November 23, 2010

Gobhi Paratha, with Pickle Raita

A 'Paratha' is basically a pan-fried Indian flatbread. With innumerable number of options as stuffing, this dish is very popularly made in the northern part of India. This is my first, successful attempt to make 'Gobhi Paratha', with the stuffing properly tucked in between the layers (and not oozing out, like it did in past times). This is perfect for breakfast, brunch, lunch, dinner and for almost anytime & any day. Enjoy.


Gobhi Paratha

Preparation:

Cut cauliflower into florets and grate. We need 2 cups of shredded cauliflower.

In a mixing bowl, add 1 cup of whole wheat flour and 1/2 tsp of salt. Add water (about 1/2 cup) little by little to form a nice, soft dough. Apply little oil on the surface, cover with a damp towel or plastic wrap. Rest it for about 10-15 minutes.

In another bowl, mix - shredded cauliflower with 1 tsp of salt, chopped cilantro, finely minced green chillies (depending on your spice level), 1/2 tsp of Ajwain (carom seeds) and 1/2 tsp of cumin seeds.
Thoroughly mix them all and rest for 10-15 minutes as it leaves excess water.. Squeeze out the water out of the cauliflower mixture. This step of resting and squeezing out the excess water is very important to avoid watery-stuffing.

Knead the dough a little bit more and make 6 small, lemon-sized balls out of it. Roll each one into about a 3 inch diameter roti, place about 1 tbsp of stuffing in the middle and close it, like you do for a dumpling. Do the same for the rest of them too.

Now that the first stuffed ball has rested for couple of minutes, with a rolling pin slowly roll them out into parathas, making sure the stuffing doesn't come out. (even it does, trust me it taste fabulous). But for a perfect one, the stuffing must be between the two flaky layers of the paratha. With enough practice we will get that too. :-)

On a hot griddle, place one paratha at-a-time, on medium heat , Cook on one side (with some bubbles popping up) and then to the other side. Once done, spear some desi ghee or some oil. Serve.

Pickle Raita


If you are very very hungry or have short time on hand - then pickle raita is the best accompaniment for almost anything, especially for such parathas.

All you have to do is beat the yogurt for couple of minutes and mix some of your favorite pickle (I added tomato) into it. - less or more, depending on how spicy you want. The coolness from the yogurt works so well with the heat from the pickle. this is definitely my all-time favorite quickie side-dish.

Hope you are having a fun Thanksgiving week.

until next time,
Siri

February 7, 2010

Fried Cauliflower Curry

..the moment I came to know that Jaya has extended the deadline for her 'repost event', I was all excited & ready to try my first recipe, ever posted on my blog 'the Vaangi Ulli Theeyal'. Truth to be said, when I tried my hand the first time on this recipe, I was not impressed with the outcome. Yes, the taste was good & edible but there was no 'W.O.W' factor involved.

..I wanted to get that this time..so the next thing I did was - I researched and finally landed on Sig's blog - 'Eggplant Theeyal'. and was truly impressed!...my motto was to get the 'brown sauce' she mentioned in her post.

...well the result is below -


..no brownness as expected becoz - I added too much of coconut! :(.. I love grated coconut in gravy-based dishes, so out of that habit, I added I guess a tad bit more than expected. I was too depressed to even blog about it but the verdict my roomies gave while their taste-testing was very encouraging. They loved it! C'mon who doesn't love coconut. :).. So, I am happy now..am gonna try this again, add 'right amount' of roasted coconut with spices & get the 'brown sauce' into it! :-).

..and as many of you all know, we had a very heavy spat of snow from past two days here in DC area. Normally I love snow but I hate anything 'too much of it'..:(.. All of us were literally stuck at home and thank goodness we did our errands on Friday itself!


..in such depressing times, our minds automatically trigger for some serious 'indulging & comforting food' and my roomie, P made one such dish. As per her, there was no particular name for this, so we came up with one - 'Fried Cauliflower'. Paired with some simple Jeera rice & above Theeyal on the side, it was pure heaven! Thank you P for brightening our long, boring, snowy days with this awesome recipe. :)


Fried Cauliflower

Ingredients:

1 medium-sized cauliflower
4 cups corn flour
2 tbsp all purpose flour (maida for binding) [this is not added in this recipe]
2 tbsp garam masala
salt -to taste
1 tbsp red-chilli powder
1 medium sized onion, chopped
2-3 green chillies, finely chopped
1 tsp chilli-garlic sauce (store-bought)
1 tsp tomato ketchup
oil - to fry


Preparation:

1. Cut cauliflower into small florets and pressure cook them with enough water. Drain the water & keep aside.(don't let them completely cool down)

2. In a mixing bowl, add corn flour, garam masala, red chilli powder, salt with warm (pressure-cooked) cauliflower florets. Mix well until the florets are properly coated.

3. Heat oil in a pan and fry these coated cauliflower florets. Drain the excess oil on paper towels.

4. Now, heat a tsp of oil in a separate kadai and saute onions with garlic & green chillies, until light golden brown. then drop the fried cauliflower florets. Mix in the ketchup & garlic sauce. Adjust the seasoning if needed.

5. This can be eaten just an an appetizer or snack or as a side-dish. Enjoy!


P says - She was asked to make this dish for almost every potluck party until now and it is always gone in minutes!..After tasting this, I am not-at-all surprised by that! :-) 

Hope you all have a wonderful week ahead!

Chao,

April 25, 2008

Straight Out Of Puck's Oven # 2 : Twice Fried Rice

Welcome to the second edition of my weekly series - 'Straight Out of Puck's Oven' and here I present a rice dish - 'Twice Fried Rice' from Puck's cookbook - "The Wolfgang Puck Cookbook: Recipes from Spago, Chinois, and Points East and West".


Its a versatile dish and one can jazz it up with any kind of veggies that are in season. This is definitely one such Puck's recipes which can stimulate your appetite and would want you for more and being a huge veggie lover, I thoroughly enjoyed it...:)

Ingredients

2 cups Rice (Recommended: Long Grain Rice)
4 cups of Vegetable Stock
Salt to taste
Veggies I added- Cauliflower, Green Beans, Broccoli, Tomatoes (Original Recipe: Napa Cabbage, Mushrooms, Green and Red Bell Peppers and Snow Peas)
1/2 Onion - thinly sliced (my addition)
1 to 2 tablespoons Olive Oil (Recommended: Peanut oil)
1 egg, beaten
1/4 cup soy sauce

Note: The original recipe asked for 1/4 cup of Soya sauce for 1 cup of Rice. But, I don't like the strong, pungent taste of Soya Sauce, so I halved it.

Preparation:

1. Place the rice in a saucepan and add the stock and salt. Bring the liquid to a boil, reduce the heat, cover and cook slowly for 15 to 18 minutes. It is important to cook the rice until dry. Turn the rice out onto a large platter or baking sheet and let it air dry for up to an hour. (or) Place the rice on a baking sheet and dry it in the oven at 200 degrees F for 30 minutes, stirring two or three times with a fork. I followed the latter option as its much quicker.

2. Take a fork and thoroughly fluff the rice.

3. Heat a wok or large skillet until it is very hot, pour the oil in around the edges, and then stir fry all the vegetables for a minute. Add rice and continue to stir fry for another 30 seconds. Pour the egg in around the edges of the wok or skillet and quickly stir it into the rice and vegetables.

4. Finally, stir in the soy sauce. Cook for couple of minutes. Serve hot with the choice of side dish!


Off this goes to Kalyn's Weekend Herb Blogging, this week guest hosted by Coffee and Vanilla.

Have a great weekend ahead folks!

Related posts:

Straight Out of Puck's Oven # 1: Couscous Salad


- Siri

November 12, 2007

Mixed Veggies dipped in Tomato Sauce

It is one such cold, chilly evening when my tummy wanted to have a big bowl of hot, simmering mixed vegetable curry for dinner, but with a twist of tomato. As you wish my 'aaka' (master) said my heart, and here it is - " Mixed Veggies dipped in Tomato Sauce".


There is something very soothing and comforting about having a big heap of hot rice and a pot of creamy vegetable curry on a cold, chilly and gloomy winter night. Isn't it !!
and today I am in a mood of experimenting with some known flavors like veggies and spaghetti sauce. Wondering where this spaghetti sauce came from... hmmmmm.. thats the secret of the tomato sauce of my version of mixed veggie curry. Read on to find out how...!!
I promised Suganya of 'Tasty Palettes' to make something exclusively for her 'Vegan Ventures' event, November being a Vegan Month. Forwarding this recipe to you dear and will try to make more in coming days..:)


Ingredients:

1. Veggies whatever u can find - I used cauliflower, broccoli, carrots, beans, potato
2. 1 big Tomato (chopped)
3. 1 medium Onion ( finely chopped)
4. 1/2 cup spaghetti sauce ( or tomato puree will do !!)
5. Salt - to taste
6. 1/2 tbsp Chilli powder
7. 1 tbsp Oil
8. 1/2 tbsp Garam Masala ( for that Indian kick !!)
9. Water - if needed

How to make:

1. HEAT oil in a skillet, add finely chopped onion and fry until golden brown.
2. ADD tomatoes, par-boiled veggies and mix well. Cook for few minutes.
3. POUR a good amount of spagetti sauce over the veggies. Add salt, chilli powder, and garam masala one by one.


4. MIX the content well. Cook for 7 to 10 mins until the veggies are nicely dipped into the tomato sauce and soaked with its flavors...:)
5. GARNISH with coriander leaves or a big dollop of cream and ENJOI with hot rice or as it is..:DD

Another Look....


Also sending this to Sra's 'Grindless Gravies' Event..:))

A Big Thank You for all you wonderful fellow bloggers who visited my blog often - as it crossed a 10,000 visitors mark with this post. Thank You dearies..:DD
-----------------------------------------------------------------------
In the news:
Hidden Music in Da Vinci's 'Last Supper'
Google casts a shadow over Firefox
Antique Fridge could keep Venus rover cool
-----------------------------------------------------------------------
 
Related Posts Plugin for WordPress, Blogger...