Showing posts with label Dips/Chutneys/Sauces. Show all posts

March 20, 2017

How To Make Fresh Tomato Basil Sauce Recipe


It was a balmy Sunday morning yesterday where I woke as usual, all geared up to get a few things done on my todo list and was sipping my morning tea when a realization hit like a thunder. If I do my math right, the year 2007 was when I first started blogging; that means this year marks the 10th year anniversary of my food blogging. OMG! 10 years? I have never done anything consistent for that long, ever. I am known to my friends and family to feel super excited about something and getting easily bored after an year or two. No! I thought. I can't abandon my blog anymore. Blogging has given me a sense of purpose when I needed the most, good friends who saw me stumble & grow and gave many cherished memories that still make me smile. I promised myself to blog consistently from now onwards.

I might not be blogging since past few months but I have been active on Instagram where I am sharing my adventures with latest love - Bullet Journalling. In the kitchen, my meals these days are quick and make ahead like today's recipe - Fresh Tomato Basil Sauce, which can be used in a number of different ways like pasta sauce, pizza sauce or even as a base for a quick soup. Make a big batch, store and enjoy. Happy Cooking!

How to make Fresh Tomato Basil Sauce Recipe

September 24, 2014

[VeganMoFo 2014] Under 15 minute Easy South Indian Coconut Chutney Recipe + Two Giveaways: Modern Spice by Monica Bhide and A Matter of Taste, a book on Indian writing on Food


If there is always one accompaniment while having breakfast at my mum's place, it is definitely this Under 15 minute Easy South Indian Coconut Chutney. I have been eating it with my idilis and dosas for as long as I remember and now I thought it is a perfect time to share the recipe with you all. All you need is fresh coconut and a handful of ingredients. Every south indian breakfast deserves a simple to make chutney as a side and after trying this version, I guarantee you will instantly fall in love, never to look back again! And while you are at it, don't forget to leave a comment on this post to mark your participation for the TWO book giveaways (Day 3) Scroll down for more details. If you haven't tried your luck already, do leave a comment on Day 1 and Day 2 giveaway blogposts as well. Good Luck! 


Day 3 | Two Books-A-Day Giveaways


September 5, 2014

[VeganMoFo 2014] K for Korivi Karam | Ripe Red Chilli Pickle | Andhra Recipes


It has been exactly 2 months that I posted a recipe for my ambitious A to Z Andhra Recipe blogging. It is not that I forgot about the challenge, but it is just that life has got in the way and have been making, posting recipes made with ingredients bought on a whim or with those that are readily available in my pantry. I have not set myself any particular deadline for A to Z blogging, but am determined to finish it at some point of time. Today's recipe is for the letter K. Red Chilli pickle made with fresh, ripe chillies or Korivi Karam as we call it in Telugu is a quintessential condiment that you would always always find in our fridge or on our dinner table. It very easy to make and serves as a perfect side when we are in need of a dash of spice in everyday dal rice or curd rice. A household favorite that we tend to go overboard sometimes and end up drinking buckets of buttermilk to cool the heat off. :-)  


September 1, 2014

My blog turns 7 years old! | No Grind Gongura Pachadi | Chutney with Sorrel Leaves Recipe for [VeganMoFo 2014]


It's that time of the year again when we celebrate a blog anniversary and some serious Vegan food. Oh yes, this blog turned SEVEN years and also it's time for VeganMoFo 2014. Woohoo! Last year, a few days into the game, things on the personal front got awry and I had to abandon the challenge mid way. This year, am determined to see it through the end. The goal is simple: to cook and publish a vegan recipe every single weekday of September 2014. I did the math and that will come up to 21 new recipes. :-) Wish me luck folks and here I am with the first recipe for the vegan challenge - an easy-peasy No Grind Gongura Pachadi i.e Chutney with Sorrel Leaves, a favorite in my household and devoured every single time my mother makes it. 


September 20, 2013

[VeganMoFo 2013] Vegan Basil Almond Pesto in a Mortar and Pestle


This post should have been published few days ago. But, you know Life. It gets busier when one least expects it and now I have jotted down so many things in my "to-do-list" that I have stopped frantically checking it for every few minutes. I took a deep breath, closed everything else and sat down to - write about my absolute favorite way to make pesto, not in a food processor but the old way, in a mortar and pestle. :-)


September 12, 2013

[VeganMoFo 2013] Brown Rice and Black Lentil Bagel Burgers Recipe


I still remember, it was about 5 years ago, a perfect sorts of evening - when it was slightly drizzling outside and I was sitting by the side of our window with a pen and a pencil, to jot down those few things I want to do before I turn 30.


June 11, 2013

[Book Review] Bongmom's Cookbook by Sandeepa Mukherjee + Beguni (Spicy Eggplant Fritters) with Dhonepata Chutney (Coriander Chutney) Recipe


Just when I thought that food memoirs are getting one-dimensional (read as boring), I stumbled upon Sandeepa's new book which she penned based on her childhood memories of being a bong. In her introduction page she says - "This is my story, but it might well be yours and may be even yours". That's so true to its every word.


May 12, 2013

{Amma's Recipes} - Tangy Green Tomato Chutney Recipe


Amma's recipes is one such column on this blog, which is very close to my heart. These are the recipes which my mother perfected over many many years and reflects how awesome a cook she is. It is also fun to just photograph once in a while, without thinking about what and how to make a recipe, worrying whether it would turn out well or not. She Cooks, I Photograph. That is the deal. :-) If you guys have any questions, do drop in a line or comment. My mom will be more than happy to answer all of them.

A meal must always be given the respect it deserves. My mother made sure we did exactly that when we were young. She taught us the value of money, value of having good people around and how to be street-smart in this hard, competitive world. Rather than just saying, she always followed her heart and did things the right way. Will you ever be wrong?, I always tease her. :-)


April 3, 2013

{Easy Summer Recipes} Roasted Beet Salad with Yogurt Dressing


I am a great fan of the juicy, natural sweetness that beets tend to offer. And a drizzle of a super simple yogurt dressing on the top gives a nice summery, cool twist to my favorite vegetable. Now, that's what today's recipe - Roasted Beet Salad with Yogurt Dressing is all about - as easy as simply tossing the beets in an aluminum foil to roast along with a spice marinade, cutting into wedges and serve some dressing on the side. The recipe is adapted from Modern Spice by lovely Monica Bhide. I owned this copy for quite a while and like many others on my cookbook shelf, I didn't get a chance to cook from it. Until today!

A word of caution - the photographs tend to get messier by the end as I couldn't stop myself from tasting the the gorgeous salad. I hope you wouldn't mind. Its definitely one of the quickest photo shoots I ever did for any recipe. :-) Now, You got to see how greedily I ate right? The below photograph is the proof...

Enjoy and make some today!


 Roasted Beets neatly arranged with Yogurt Dressing in the middle


{Recipe} Roasted Beet Salad with Yogurt Dressing

Serves 3-4
Source: Modern Spice by Monica Bhide

Ingredients:

For the beets -

4 medium sized beets, different colors if possible, trimmed. [I used only red beets]
1/2 tsp black pepper powder
2 tbsp olive oil (original recipe suggests vegetable oil)
1 tbsp coriander powder
few curry leaves (my addition)

For the dressing -

3/4 cup plain yogurt
1/4 teaspoon minced ginger
1/2 tsp sugar
1/8 tsp salt

Preparation:

1. Preheat oven to 220 C or 425 F. Wash the beets and pat them dry.

2. In a bowl, combine black pepper, vegetable oil, salt, coriander powder and curry leaves. Drop the beets and coat them well.

3. Place the beets in aluminium foil and wrap them tightly into individual pouches. (The original recipe suggests to wrap the beets in a large piece of foil as a single layer). Also if you are using different coloured beets, wrap each color individually. Place them in a rimmed baking sheet and bake for 45 to 50 minutes until the beets are cooked thoroughly. The beets are cooked when they can be easily pierced with a knife.

I used the remaining marinade as a dip for my bread. It does taste yum with the coriander powder and curry leaves.

4. Take out the beets from oven and allow to cool to room temperature. Remove from the foil and the skin should peel off very easily with fingers or a pairing knife. Gently scrape off any spice marinade on parts of beet. Cut them into wedges and arrange on a plate.

5. To make the dressing - Place all the ingredients listed for "dressing" above in bowl and whisk to combine. Add water if you wish to have a thinner consistency but donot add oil.

6. Spoon the dressing on the beets and Serve immediately.

Sometimes messy is so gooooooooooooood!


This is Recipe 25 added to my The 100 Recipe Challenge for Year 2013. Check out the rest of the recipes too!

**********************************************


Did you like what you just read. then Subscribe to Cooking With Siri feed  (OR)

Enter your email address and Never miss a post..


Delivered by FeedBurner

Be the first one to know what I am going to post next by "Liking" Cooking With Siri page on Facebook and follow me on twitter.

until next recipe,

November 21, 2012

Amma's Recipes: Toor Dal Chutney | Kandi Pachadi Recipe

 
Amma's recipes is one such column on this blog, which is very close to my heart. These are the recipes which my mother perfected over many many years and reflects how awesome a cook she is. It is also fun to just photograph once in a while, without thinking about what and how to make a recipe, worrying whether it would turn out well or not. She Cooks, I Photograph. That is the deal. :-) If you guys have any questions, do drop in a line or comment. My mom will be more than happy to answer all of them. 


Toor Dal Chutney | Kandi Pachadi as we call in Telugu

Being a working mom, with two picky-not-so-obedient kids and no support from either of in-laws, it was quite challenging for my mother to effectively take care of both work and home fronts. But, she did such a beautiful balancing act that we never felt she was not around or we are not being fed with proper home-cooked meals. Eating out in fancy restaurants was a bit of a luxury for us, growing up and reserved for only super-special occasions like birthdays.

Simple ingredients, quick & easy chutney recipe

On days when my mother would reach late at home, she would quickly whip up this super simple chutney for us. My dad would put the rice in the rice cooker, melt the ghee and fry few papads by the time she is home. In less than 15 minutes everything would come together and dinner is served. Even till today, this recipe tops the list of favorite-childhood-recipes-one-cherishes-forever. !! :-)

{Recipe} Toor Dal Chutney | Kandi Pachadi


Ingredients 

1/2 cup toordal (split pigeon peas)
3-4 dry, whole red chillies
a pinch of turmeric powder
1 garlic clove
1 tsp cumin seeds  (jeera)
1 tbsp tamarind pulp
1 tbsp oil
salt - to taste

For Tadka - (1 tsp each of mustard seeds, cumin seeds, urad dal) + few curry leaves + a pinch of hing + 1 tbsp oil

Preparation:

1. Heat a pan and add oil. Once hot, roast the toor dal until its light browni-sh color. Add in red chillies, garlic and cumin seeds. Fry for 1-2 minutes on low heat. Season with turmeric and salt. Remove from heat and cool a bit.

2. Grind the dal mixture along with tamarind to a coarse mixture by adding water little by little. Transfer the chutney into a serving bowl.

3. Heat oil in a small pan and add all the ingredients listed for "Tadka". Once the mustard seeds start to splutter, pour the tadka over chutney and Mix well.

4. Serve it with hot rice, ghee and papads. Yummilicious!


Kandi Pachadi


***Giveaways for this Holiday Season***

Last Date: November 30th 2012

{Holiday Giveaway 1} A chance to win Canon Powershot Camera giveaway (Open for Indian Residents only ) - Try your luck here.


{Holiday Giveaway 2} Win $25 Amazon and Olive Garden giftcards. (Open for everybody) - For more details, Click here.


~ Dinner is Served ~


Today is Day 21 of my NaBloPoMo challenge. Check out all of the posts previously published here.


Did you like what you just read. then Subscribe to Cooking With Siri feed  (OR)

Enter your email address and Never miss a post..


Delivered by FeedBurner

Be the first one to know what I am going to post next by "Liking" Cooking With Siri page on Facebook and follow me on twitter.

until tomorrow,


December 26, 2011

Lets Paint It 'Green': Mint Peanut Chutney {Pudina Chutney}

No, it is not St. Patrick's Day yet. I will be 'going green' with my recipes, all of this week for an another reason. (Click here to know whyTo know what it is, you gotta wait till December 31st 2011. :-).

On an another note, I can't believe that the last week of the year 2011 has already started and I have to post only 6 photographs more to finish my Project 365. Trust me, posting a photograph every day of the year has not been easy. Especially when we had to pack our bags and move back to India in April, I thought of just giving up. But, my love for photography was at its peak then, so couldn't let it go, just like that...and I am so glad I stuck with my decision. Or else, how else would I have captured my little sister's wedding (or) found out my new passion for Black and White photography...

Mint leaves are available in abundance in the markets. Go grab some and make this chutney..

For me, a piquant chutney is what completes a meal. I, sometimes just spread some on a piece of toasted bread and enjoy it as-is. Today's recipe -  Mint Peanut Chutney is one such combination which tastes delicious with everything and anything. It is incredibly easy to make and last for a good whole week when refrigerated. Enjoy!

Cook mint leaves and green chillies until wilted.

Grind the chutney to a consistency of  jam..

 Mint Peanut Chutney {Pudina Chutney}


Mint Peanut Chutney {Pudina Chutney}

Ingredients:

pudina/mint leaves, 1 big bunch (3 tightly-packed cups)
green chillies, 8-10 , halved
sesame seeds, 4 tbsp
peanuts, 4 tbsp
oil, 2 tsp
tamarind extract, 1 tbsp

Tadka -

oil, 1 tsp
urad dal, mustard seeds, cumin seeds - 1 tsp of each
red chilli, 1
hing (asafoetida), pinch

Preparation:

1. In a pan, dry roast peanuts and sesame seeds. Keep aside.

2. Heat oil on a medium-low heat. Add mint leaves and green chillies. Cook for few minutes, until wilted. Season with salt and turmeric. Finally add tamarind extract. Cook for 1-2 minutes. Allow it to cool a bit.

3. Grind together - mint leaves mixture with dry roasted peanuts & sesame seeds. Adjust salt if needed.

4. In a small pan, heat oil and add all ingredients listed under 'Tadka', until slightly brown.

5. Add tadka to pudina chuntey and Serve with hot rice or with dosa or idli. Store the rest of it in an air-tight container & refrigerate until next use.


Here is what other FSB members have posted until now -

Mittu - Blueberry and Lavender Cream Pie [Violet]
Nags - Easy Basic Cake Pops [Blue]
DK - Risotto Alla Milanese [Yellow]
Deepti - Citrus Golden Sangria [Orange]
Lata - White and kidney beans falafels and spicy hot vandikkaran chutneyFilled and Grilled Red PeppersJam and Fruit Tart [Red]


****************************************************************************************************************************************

Give Away: 

It is Holiday Season and best time to spread some happy cheer all around. Its time to give-away something special to my readers who supported me all along the way. Check out these two give-aways - One for peeps in India and other for US residents and enter today, if you haven't already. Last Date - December 31st 2011.


Did you like what you just read. then Subscribe to Cooking With Siri feed  (OR)

Enter your email address and Never miss a post


Delivered by FeedBurner

Be the first one to know what I am going to post next by "Liking" Cooking With Siri page on Facebook and follow me on twitter.


until next time,

September 15, 2011

Basic Eggplant/Brinjal Chutney

At the end of the day, a tired cook often thinks of dinner of buying some prepared foods. Sitting in not-so-far-away Bangalore, peeping out of our french window, the rain falling pitter-patter all over the horizon, I think of my mom's easy-to-prepare, filling home cooked meal - hot rice cooking in the rice cooker, a simple yet delicious eggplant/tomato/toor dal chutney, papads with tomato rasam and yogurt. For me, rasam and papads are each other's buds, friendship-made-in-heaven.


Today, I am sharing with you all one such chutney which can be made on a whim, anytime of the day as it doesn't need many ingredients, but flavorful nonetheless. Also, for the keen gardeners among us, chutney is an ideal way to use up excess home-grown eggplants (or any other veggies) and it stays good at least for a week, when stored in refrigerator.

There were times when I literally licked the spoon sitting on the kitchen counter, right beside my mother when she made this eggplant chutney for us. It is a silken delight with a faint hum of tamarind and a zing of curry leaves. Tastes delicious when served with hot rice & ghee. I use the left-over chutney (if any) as a spread for my sandwiches as well.

Enjoy.


Basic Eggplant Chutney [Vankaya Pachadi]


Recipe Source: My Mom

Ingredients:

6 eggplants/brinjals (preferably long green/purple ones), cut into pieces
4 tsp canola oil
salt - to taste
1/8 tsp turmeric
1 tbsp (or more) red chilli powder
2 tbsp or lemon size tamarind

For tadka:

1 tsp oil
little asafetida (hing)
1/2 tsp of each - urad dal, mustard seeds, jeera.
few curry leaves

Preparation:

1. Heat oil in a pan and add eggplant pieces, salt, turmeric, red chilli powder and tamarind. Cover the pan with a plate filled with water and cook on low-medium heat until the eggplant is completely cooked. Mix once or twice in the middle.Cool and grind into chutney-like paste. Adjust salt, if needed.

2. Heat a small pan for tadka and add all the ingredients listed above. carefully add curry leaves as they tend to splutter in oil. Mix this into the chutney. Serve.


This is my entry for Back 2 Basics: Chutneys guest hosted by me this month, originally conceptualized by Jaya, the Desi Soccer Mom. Send in your entries too. Will ya? Last Date for participation is October 7th 2011.

Some Weekend Reading:

Everybody is busy ok? - a hilarious post by the very famous The Local Tea Party
Speaking of Writer's Block - The New Yorker
An Epicurean Pilgrimage: Meals Worth the Price of a Plane Ticket - NYT
Chez Panisse: Forty Years Later - Ruth Reichl
Sam Sifton is Out As Times Food Critic - The Atlantic Wire

until next time,


Did you like what you just read. then Join in and Subscribe to Cooking With Siri feed  (OR)

Enter your email address and Never miss a post


Delivered by FeedBurner

Be the first one to know what I am going to post next by "Liking" Cooking With Siri page on Facebook and follow me on twitter.

May 11, 2011

Amma's Recipes: Bhindi Fry, Roasted Eggplant Pachadi and Raw Mango Dal

I said in my last post that we were in amidst of moving continents, I meant - "We were moving back to India, for good".. now that is a one bold move, Isn't it? Yes, indeed it is and after a week, we both still think - *the move* was one of the best things happened to us. For one real reason, we are close to the family & the freedom to do/start whatever we want. :-). But, I think if you really wanna come back like us, you should have a proper plan about how & what your are gonna do here. Or else all you will end up having is the regret that you have missed on a golden opportunity to settle in the supposed land of dreams - The USA.

One other added bonus staying back home is that - I can eat my mom's food whenever I want, whatever I want. No need to wait for one whole year, to eagerly wait to come back home and no more secretly praying for the dreadful *day-of-return-to-US* not to arrive. :-)

Now, isn't it natural that I would feature some of my mom's classic recipes here on my blog, after all the main purpose of maintaining a blog is to chronicle the recipes that actually work. Trust me, many a times, I myself check out my recipe index for recipe ideas. Hence this section - "Amma's Recipes", so that you and I both can  savor and also have all her recipes written down somewhere.

P.S - All of these are/will be made my mother and I am playing the role of mere photographer here. No props, No artificial lighting, Photos taken, straight from the utensils in which my mom serves us dinner. I hope you all will love these as much I do and did from past many many years. If you have any questions, feel free to drop a comment, I will clarify with my mom and answer at the earliest.

Today's dinner thali - Bhindi Fry, Raw Mango dal. Roasted Eggplant Pachadi with steamed rice, ghee, oora mirapakayalu (sun dried green chillies) and yogurt.

It looks something like this....


Enjoy....


1. Bhindi (Okra) Fry


Preparation:

1. Wash and dry about bhindis. Cut them lengthwise, into 1-2 inch pieces (as shown in the pic above).

2. Heat enough oil and deep fry the cut bhindis. Using a slotted spoon, put them on paper towels, so that the excess oil is drained off. Keep aside.

3. Heat 1/2 tsp oil and add 1 tsp of each -  urad dal, mustard seeds, cumin seeds with 2-3 slit green chillies, few curry leaves, 1/4 cup peanuts, a whole garlic clove which is pressed down with knife (no need to mince), deep fried bhindi, 1/8 tsp of turmeric, salt to taste and 1/2 tsp or more of red chilli powder. Saute for no more than a minute. Mix well.

4. Finally, add 1 cup of shredded coconut and immediately turn off the heat. Mix well once again and after couple of minutes, it is ready to Serve. 


2. Roasted Eggplant Pachadi


Preparation:

1. Oil 2 big eggplants and roast them on a medium flame until it becomes a bit mush. Cool a bit. Drop them in cold water and then remove outer charred (almost black) skin. Make sure there are clean (with no worms) inside out.

2. Coarsely grind -- (5 green chillies + 1 tsp cumin seeds + salt to taste + 1/4 tsp of turmeric

3. Add in the eggplant with the (green chilli + cumin) mixture. Mix well. Keep aside.

4.  Heat 1/2 tsp oil and add 1 tsp of each -  urad dal, mustard seeds, cumin seeds with few curry leaves and 1-2 red chillies. Add this poppu to the eggplant mixture. Mix and Serve. 


3. Raw Mango Dal


Preparation:

1. Peel and cut a fresh raw mango into pieces. Make sure you discard the seed in the middle. Boil the mango pieces with about 1/2 cup water until its completely cooked. Using a spoon, mash into a pulp.

2. Pressure cook 1 cup of toor dal until 3 or 4 whistles. Once the pressure is off, slightly churn the dal.

3. On a low flame, mix churned dal with mashed mango pulp with 2-3 slit green chillies, few curry leaves, 1/4 tsp turmeric, salt to taste and 1/2 tsp of red chilli powder.

4. Heat 1 tsp of oil and add 1 tsp of each - urad dal, mustard seeds, cumin seeds with 2 red chillies and a whole garlic clove, pressed down once with side of the knife. (no need to mince). Add in the dal and mix everything. Serve with steamed rice and ooru merapakayalu (sun dried green chillies).


Bon Appetit everybody..

until next time,
Siri

April 14, 2011

Mom's Ven Pongal (Khara Pongal or Ghee Pongal) with Madras Tomato Chutney

We will be in a whole new yet our own world - in less than 15 days. Many many exciting  things and lots of last-minute traveling happening at our end, hence this short, unintentional break from blogging.

So friends, after a lot of contemplation, after staying in US for 6 long years, we are finally relocating back to India. On one side, I am butterflies-in-my-stomach-excited, but I also feel sad at the very thought that we might not come back here. :-(. But, did you know what Mr.JB says - Never Say Never. So, I am hopeful that someday we will get to visit here yet again and meet all my lovely friends I have made over the past few years. :-).

That said, it has been months ago that we planned our 10-day trip to Hawaii and finally, we did go there in the first week of April, for our first anniversary.


I am falling short of adjectives to describe to you guys - about how beautiful and mesmerizing the islands of Hawaii are. Everybody likes the beach the most, I suppose but for me, Kaui was the best. It is called the"Garden Island" because of its lush, green, mostly untouched & uninhabited surroundings. I felt a weird sense of peace within myself by just looking at the majestic canynos, sugarcane/coffee fields and the weather itself is so cool. :-). But, the TH loved Maui the most as it is mostly sunny with lovely blue skies.

Well, each of the islands have something new and unique to offer and it is a place to be visited atleast once in a life time.


Waikiki Beach, Honululu


Hula dancer, performing for a Japan fundraiser at Honululu.

Our 10 days of Hawaii trip included a 7 day cruise on the "Pride Of America" cruise ship. Never before, we went on a cruise. This was our first one. We were a bit apprehensive at first to spend 7 days & nights on sea but then the excitement won over the fear. I am so glad we did this as it will be one of the memorable experiences for sure. :-)

If you are like us who wish to visit 4 main islands of Hawaii (Oahu, Maui, Big Island and Kaui) all in just one week, then I would strongly recommend to island hop via a cruise. No hassle of flying and booking hotels in every island. From whale watching to witnessing Kilauea Volcano or for some dramatic views of the Napali Coastline, all can be done during the day time and as the night falls, you can return back to the ship, ready for sail to the next one.

More Hawaii pics - on my photo blog.


Being a foodie and a vegetarian, I suspected we would have limited choice when it comes to food on the ship. I would say I was partially right. Having said that, we were quite impressed at the variety of options available to us. There was a special booth called "Curry Kitchen" and there they were - fried pappadams, to pieces of naan with sometimes aloo-gobhi curry or palak-tofu curry or rajma & basmati rice of course. For breakfast, we had hashbrowns, made-to-order omlettes, oatmeal with lots & lots of fresh fruits (hey! we are in Hawaii, remember ;-)).

An extra special mention about the dessert section - Oh my my, they had brownies, lemon mousse, white chocolate mousse, apricot bread & many many more which I can't remember right now. & they all tasted so delicious. I must have put on some extra pounds just because of these desserts.

But, by the end of our vacation, my hands were itching to cook a warm south-indian meal and devour on it. We wanted stuffed eggplant, mirchi ka salan, keerai masial or the very best my mama's vegetable biryani with aloo kurma. We wanted them all. But We couldn't until we came back home on last Saturday at 12 in the midnight. We were so hungry that I had to make a proper meal for ourselves at that odd hour and made some simple cauliflower poriyal, rasam and rice. Yes, at 1 AM. :-)

The very next day, as our Sunday morning breakfast I made this very popular Ven Pongal (or Khara Pongal) with Madras Tomato Chutney.

I am sure our tummies thanked us for this simple yet delicious meal. :-)


Mom's Ven Pongal (or) Khara Pongal


Recipe Source - My Mom

Ingredients -

1 cup rice (I used sona masoori variety)
1 cup split moong dal
1 tsp black pepper corns
1 tsp of cumin seeds
2 tsp of ghee
2 green chillies, split lengthwise
1 tbsp of cashew nuts & few curry leaves(optional - I have not used these in this recipe)
Salt -to taste

For tempering -

1 tsp each of - urad dal, mustard seeds, cumin seeds,\
2 red chillies

Preparation -

1. Pressure cook (1 cup of rice +1 cup of split mung dal ) with 5 cups of water until 3 whistles. Let the pressure release and cool down a bit.

2. Grind (I use a coffee grinder for spice powders - best 9$ ever spent) - the black peppercorns and cumin seeds into a fine powder.


3. Heat ghee in a pan on a low-medium heat, add urad dal, mustard seeds, red chilli (broken at the end tail), cumin seeds and let them splutter. Add slit green chillies, cashew nuts & curry leaves (optional)and fry for couple of seconds. Add in a tsp (or more as per your taste) of the (blackpepper + cumin) powder & little salt. Stir in the dal-rice mixture and Mix well. Add a tiny amount of water if desired.

4. Adjust seasoning one last time, put 1 more tsp of ghee on the top and close the pan with a lid.


5. After the ghee melts into the warm pongal, mix and serve immediately. that is when it tastes best.

The best accompaniment for this Ven Pongal is a spicy chutney. Don't you all agree? Here is a version of tomato chutney which I often make at home.

Madras Tomato Chutney, Take 2 with a better picture


I am sending this as entry to MLLA 34, this month guest hosted by Jaya (a.k.a Desi Soccer Mom), orginally conceptualized by Susan.

Hope to see you all back real soon. Not sure when as there is a lot of packing, cleaning and moving to do. and I might not cook for a while as I will be hogging all of my mom's food.

There are some exciting and fun times ahead (I hope) and we both are looking forward for all of them :-).

P.S - I will be updating my photo blog (365 days of Siri) on a regular basis, please do stop by there and say a hello for me, Will ya. :-)


until next time,
Siri

August 21, 2010

Your recipes..through my lens III

Ok, one recipe at-a-time for YRTML (Your recipes through my Lens) is not-working for me as I already have so many of them. It would take months to finish posting the ones I have. So, here you have - two delectable recipes which absolutely made my day.


Twice cooked tomato chutney (Click here for the recipe)

There are very few recipes when I see a shiny *glitter* in TH's eyes. He is a simple man. No fancy meals needed to make him happy. Since, I knew he loved chutneys, one day I made Sala's (with whom I had the pleasure to cook at Karma's Kitchen, DC) 'Twice cooked Tomato Chutney' & Yes folks, I did get to see his tiny blue eyes (ok, not exactly blue, black) sparkle with satisfaction. This chutney was just yummilicious.


Cabbage Upkari (Click here for the recipe)

Did I ever tell you that Cabbage is my most favorite vegetable. We both simply love it and am always in quest for different cabbage recipes, across cuisines. If you know any such dishes, please leave the URL as a comment (no fried foods please). I would love to check it out and give it a try. With some grated ginger and finely minced chillies, this Cabbage Upkari recipe is from DK's site, who is my best gal-pal and I will be for-ever thankful to blogging because of which I met such a beautiful person, in-person. :).

Hope you all have a wonderful weekend.

until next time,
Siri

July 27, 2010

Okra Raita and Mint Raita

There is absolutely nothing comforting than a bowl of cool yogurt to beat the scorchy summers outside. When I was a kid, having yogurt at the end of meal was a MUST in my house (just like in any other Indian household). Two or three days without yogurt, my body heat starts to build up till it finally signals me to have some immediately.

Yogurt with onion, tomato & coriander or Yogurt with grated carrot & cucumber are the usual combinations which one often ends up making. Today, I have two simple yet divine yogurt recipes for you guys. these can be made in a jiffy and can be enjoyed at any time of the day - as a side dish or like me, just have as-is.


Okra Raita (Bendakaya Perugu Pachadi/Vendakkai Thair Pachadi)


Stem and finely chop the okra into rounds. Heat some oil in a skillet. Add mustard seeds, cumin seeds, black gram dal (urad dal), bengal gram dal (chana dal), halved red chilli, asafoetida powder and a few curry leaves.

When mustard seeds start to splutter, add the okra. Cook on a low heat until the vegetable is tender. Add salt to taste(at the very end as it prevents it from becoming soggy) and cook for a minute or so. Cool the okra and add to the well-beaten yogurt. Blend thoroughly. Serve cold or at room temperature.

Mint Raita (Pudina Perugu Pachadi)


This recipe is by my dear friend, DK of Chef in You. Last month when I visited CA for the first time, she cordially invited me and S for dinner and then, she made this cool, Mint Raita. Once we came back, couple of days later, S was craving for this and I had to call my buddy for the recipe. Since then I must have made this tons of times, atleast twice a week. It tastes that good.

In a food processor, grind mint leaves with some beaten yogurt. Add this mint mixture to rest of the yogurt with some roasted coriander-cumin powder and salt. Whisk the contents well. Ta-dah, its ready!


I hope you are all are enjoying the summer with lots of fresh fruits & vegetables, sangrias, lemonades, hikings and outdoor barbecuing!

Don't forget to put your Sunscreen at ALL times!.

[EDIT] Sending these two raitas as entries to Suma's event about Sidedishes other than Dals & Subzis.

Enjoy,

April 25, 2010

Amma's Recipes: Coconut Chutney and Babycorn Kurma

I am back from my more than a month-long India trip yesterday and I must say, this was my best. - I did everything I wanted to right from meeting some fabulous blogger friends to roaming (& shopping) around all the new malls that sprang up in Hyderabad in my absence to relishing thoroughly my mom-ka-khana to of course, enjoying the initial few days of being a 'married woman'. Oh gosh! the latter sounds so big and 'responsible' for me. Thanks to S, I don't have to be like that, for atleast for some more years as he is so loving and lets me be, the way I want to be. :).


Isn't it true that - We, daughters after a certain age seldom be open about our lives with our dads. Thats the case with me too. But, when I saw my dad filled pride and happiness during my wedding, I kept wondering how much he loves and misses me. I love you dad and miss you terribly :(.I can't wait for my next trip back home. Hopefully end of this year. *God are you listening* :).

For some snippets about how my India trip &  more, don't forget to check out my photo blog. I outta to mention about my new look. I have always been a great fan of Lena's work and this is one more example. Her freebies & pre-mades though limited are very unique in style and render a brand new look everything single time. I hope you all like it and please let me know if you have any loading issues.

..the recipes in this post are a tribute to my mom who for me is the world's fabulous cook. I mean, she can whip n number of dishes, when she is in her ironed cotton saree which she wore to work and without an apron & a single stain on it. Everyday she used to make a new variety especially for me and all I used to do was gobble them up without even thinking of sharing with my naughty sister. (please read that as a fight for food contest ;)).. Here I present 3 such recipes which I managed to resist and take pics. :D

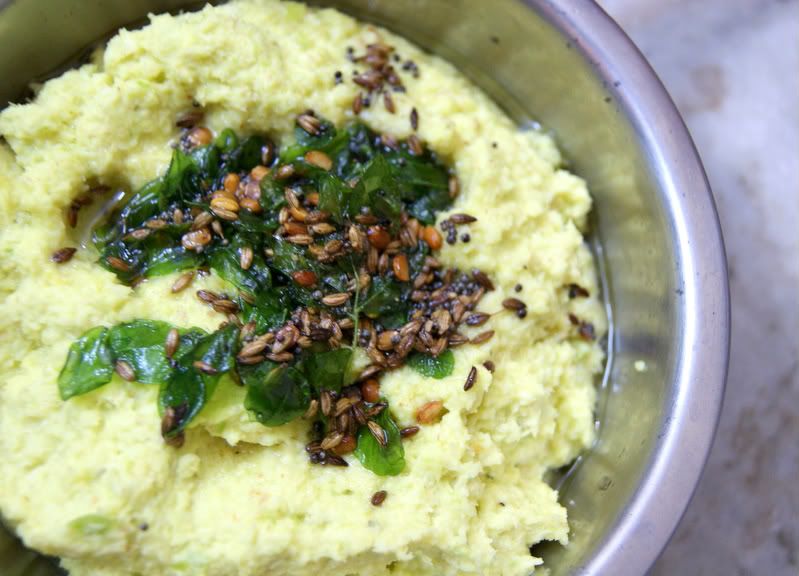
1. Coconut-Mango Chutney


Recipe:

1/2 fresh coconut, cut into small pieces
1/2 raw mango, cut into small pieces
8 green chillies
curry leaves
salt - to taste
turmeric
usual tadka mix - urad, jeera, mustard seeds, hing

Grind - coconut pieces, mango, salt, turmeric and green chillies until chutney-like consistency. Heat oil, fry  tadka ingredients with curry leaves until brown. Mix into chutney.


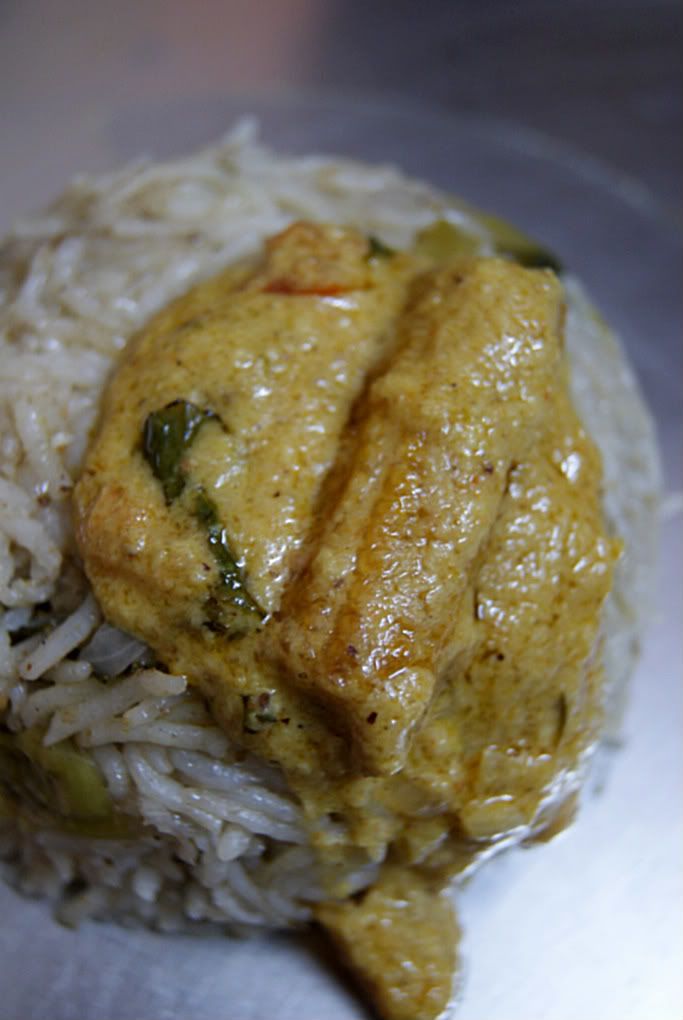
2. Vegetable Biryani with Babycorn Kurma


Recipe - For biryani and the gravy, follow the same recipe as mentioned in this post and finally fry the baby corn & add to the gravy! Yum :)

[Update] - I just received a pair of beautiful pot holders from my dear friend - Nupur. Thank you so much dear. I loved them & you definitely made my day! That's why I always say - "Blogging & Blogger friends are the best things that happened in my life".


Hope you all had a fun spring break.

cya all soon,

 
Related Posts Plugin for WordPress, Blogger...