Showing posts with label Vanilla. Show all posts

April 20, 2016

Healthy Soft and Chewy Oatmeal Chocolate Chip Cookies Recipe


Oatmeal Cookies
. Just a mere mention of these bring back so many vivid childhood memories for most of us. A classic oatmeal cookie recipe has nothing more than flour, oats, butter, eggs, sugar, leavening agent and a mix-in like raisins, chocolate chips, nuts, dried berries etc. Wouldn't it be incredible if we could put a healthy spin to our beloved cookie recipe? How about whole wheat flour, rolled oats, healthy fat like coconut oil and honey (or agave). Since quite some time I was in look out for a fool-proof recipe and am happy to report today's version is exactly that. Many of my co-workers at office loved them when I took a batch yesterday and even my skeptic better-half gave a thumbs up! Excited with the cookie success and a sweet comment about my blog on Instagram by Anusha nudged me to come out of my slumberland and actually write about them. Enjoy!

February 22, 2015

{Recipe Redux} Spectacular Chocolate Espresso Brownies


[Updated] These spectacular brownies got featured in Deccan Chronicle newspaper. Yay!

Are you a dessert person? I  am not and that might be the reason why I have only about 22 recipes blogged since seven years!. Sometimes though a rare sweet craving hits suddenly and you will see me indulge on them, guilt-free. And I have friends, nieces and a husband whose regular sweet cravings must be attended to. So, now you know why I baked these absolutely delicious brownies when the lovely bunch of people at Recipe Redux chose chocolate combo as a theme for February. These Spectacular Chocolate Espresso Brownies are fudgy in the inside and cake-y with occasional melted chocolate puddles on the outside. Also, don't you all agree Chocolate and Coffee are match made in heaven? Try it to believe it!

Spectacular Chocolate Espresso Brownies

February 11, 2015

Strawberry Cake Recipe


I was in Munich (Germany), far away from home when I first read about this recipe on Rev's blog. My immediate reaction was oh-my how beautiful does that look and next was - damn! why am I not home to bake the cake right away! Once I came back, I jumped on the first opportunity and made it - not once but twice in a row. It was that delicious. Sprinkling some sugar on top just before baking is a lovely idea to caramelize the top and to turn the strawberries into a goo-ey mess which are sneakily delicious. It is time to join the Strawberry Winter Cake Movement. Wohoo!

Nothing spells like #yum that this ridiculously easy berry cake. Trust me! :-) 

Strawberry Summer Cake
Strawberry Cake 

July 18, 2014

Plum Crisp with Dried Raisins for KitchenAid Contest (IFBM 2014) | Step by Step Recipe


[Updated on 3rd July 2014] This recipe has won the KitchenAid India contest at Indian Food Blogger Meet held at Bangalore. It was an absolute pleasure to be appreciated on such an amazing platform and it gives me that much needed boost to cook, learn and write more. Thank You!.

Let's talk today about an easy dessert recipe using plums. Remember this Homemade Fruit at Bottoms I posted sometime last year? Well, I thought there was no better way to enjoy this tart fruit other than with yogurt. It is like match made in heaven: stewed plums + cold yogurt. Today's recipe proved me completely wrong and am so glad it did. :-) Read on to get the recipe for Plum Crisp with Dried Raisins

Yes, that's me. Quietly sitting in our balcony, watching the rain and digging into the hot jar of plum crisp.

August 19, 2012

Perfect Light Desserts: {Recipe} Best Skinny Chocolate Chip Cookies with Step by Step pictures

 
"Dessert is probably the most important stage of the meal, since it will be the last thing your guests remember before they pass out all over the table."
~ William Powell

Almost everybody love desserts, but hate the extra calories that come with them. Isn't it. I wished there was a way where I can enjoy a general serving of cake or a muffin, without worrying or feeling guilty and particularly without using any artificial sweeteners or other fancy synthetic substitutes. I would rather put some pounds than using such stuff. Trust me.

In short, recipes that are low calorie, high in flavor and nothing less than spectacular always appeal to me. I am sure that is the case with you guys too.

If you like this recipe, you might also like Basic Vanilla Cookie Dough + Cut-Out (Star) Cookies
Black and White Heart CookiesWheat Free Chocolate Chip cookiesOrange Pecan Cookies 

..and I ate them all!

..and for the same, I stumbled upon a perfect cookbook during my quest. Those who love baking are already aware of Nick Malgieri's popular book - "How to Bake" and for the cookbook - Perfect Light Desserts: All Under 300 Calories per generous serving, he teamed up with David Joachim, a health food writer to create lighter desserts that are not high in calories using real butter, sugar, flour and eggs. And they do it by using them in moderation and in perfect combination. Each recipe featured has a nutritional breakdown, perfect for people who are dieting and watching their calories. Today I chose to make these simple "David's Skinny Chocolate Chip Cookies" which are super duper delicious and very moist. A keeper recipe.

Enjoy!

{Recipe} Best Skinny Chocolate Chip Cookies

Adapted from Perfect Light Desserts by Nick Malgieri and David Joachim

Makes around 30 cookies

Nick's Notes: My co-author David Joachim eats tons of these moist cookies but still stays very thin. What I love about them is the fact that they are reduced in fat and sugar, yet every bit as good as traditional chocolate chip cookies. 

Ingredients:

11/4 cups all purpose flour
1 tsp baking soda
1/2 tsp salt (omit if using salted butter)
4 tbsp (1/2 stick) unsalted butter, softened
1/2 cup brown sugar, firmly packed
5 tbsp granulated sugar
1 large egg
2 tbsp milk
1 tsp vanilla extract
1 cup chocolate chips

Preparation:

Step 1: Soften butter to room temparature. Sift flour, baking soda and salt (omit if using salted butter). Set aside.


Step 2: In a mixing bowl beat butter, brown sugar and granulated sugar, on medium speed for a minute. 


Step 3: Add egg, milk and vanilla.


Step 4: Beat with an electric mixer using a spatula to scrape down the mixture from edges.


Step 5: Add flour, 1/2 cup at-a-time and beat on a low-speed.  


Step 6: Fold in the chocolate chips.


Step 7: Cover and chill the dough in the bowl for about 15-20 minutes to keep the cookies from spreading too much while baking. I made just half a batch immediately and the rest on next day. Both the times, I had amazing results. Chilling the dough overnight definitely helps to hold their shape better. 


Step 8: Preheat oven to 180 C or 350 F. Form small balls using two spoons or ice cream scoop and arrange on a cookie sheet or a baking sheet 2 inches apart.


Step 9: Bake for about 8 to 12 minutes until the cookies look dull on the surface, have spread and still quite moist. Cool the cookies on the pans and then on wire racks for 5-10 mins. Slide them off and cool them completely. Keep the cookies between sheets of wax paper in a tin or an air-tight container.

just out of the oven. cooling.


all stacked up

A cookie tastes best when enjoyed with a glass of milk. Now you can have them as many as you want, guilt-free. No one can eat just one as the calorie count per cookie is less than 100 calories. How cool is that! :-)

Best Skinny Chocolate Chip Cookies

P.S - this is not a paid or sponsored post. I bought the cookbook, loved the recipes tested, hence decided to feature here on my blog. Stay tuned for more in coming days.

until next time,


Did you like what you just read. then Subscribe to Cooking With Siri feed  (OR)

Enter your email address and Never miss a post..


Delivered by FeedBurner

Be the first one to know what I am going to post next by "Liking" Cooking With Siri page on Facebook and follow me on twitter.


July 27, 2012

Happy Birthday: Tutti Frutti Cake | Indian Plum Cake Recipe

 
Five years ago, an angel was born. Words can't express how much happiness and joy she brought into our lives.

She is Shriya, my niece.

Shriya, during her trip to Alaska. Image Credit
It feels like yesterday when she was so tiny that she barely fit into both of my hands. Now, she can talk non-stop, make you really think and many at times, stump you with questions which we barely can answer. One Curious George this kid has grown into. ;-)

Sadly, this year I am not with her to celebrate and squeal for her birthday. Hence, gifts were sent with loads of love & kisses from her uncle and aunt along with this Tutti Frutti Cake, which I am sure she would have totally loved.

So here I am celebrating Shriya's birthday virtually atleast , with all of you. 

Love you baby. 


This is such a splendid recipe for a moist cake with just few tablespoons of butter. I made two loaves (doubling the original recipe). One was for my family here in Hyderabad and other for office colleagues in Bangalore. All of them loved it and went for seconds. Just perfect for any occasion and anybody, especially for kids.

Enjoy!


{Recipe} Tutti Frutti Cake | Indian Plum Cake

Makes two loaves - one for round 9 inch cake pan and another for 9 inch loaf pan. This recipe can be easily halved for just one cake.

Adapted from Sharmi

Ingredients:

4 cups all purpose flour/maida
2.5 cups granulated white sugar
1 cup tutti fruitti pieces (these are chopped, candied fruit pieces)
4 tbsp unsalted butter, softened
2 cups milk
4 eggs, at room temparature
2 tsp baking soda
4 tsp baking powder
6 tsp vanilla essence
few mixed nuts like cashews, walunts etc, to sprinkle on the top

Preparation:

1. Sieve flour, baking powder and baking soda. Mix tutti frutti pieces with little flour and keep aside.

2. In a large mixing bowl, mix butter and sugar. Using at electric mixer or whisk, add one egg at a time and beat well until creamy. Add vanilla essence and milk. Mix well.

3. Add flour+baking powder+ baking soda mixuture one cup-at-a-time, mixing with spatula scraping through the edges each time. Fold in tutti frutti.

4. Preheat the oven to 180 degrees C. Grease the pan with butter and flour, tap to remove off excess.

5. Pour the batter in the pans and pat it on floor to ensure the batter is evenly distributed. Bake for 35-40 mins until a tooth pick inserted comes out clean. Once out of the oven, cool completely on a wire rack and then serve.


Just a few more days left to enter Quick Fix Indian Cookbook Giveaway. Try your luck today.. Last Date:  July 31st 2012.

[Update- August 7th 2012] - I made an eggless version of this cake for my little sister's and cousin brother's birthday by substituting 2 eggs with 200ml of sweetened condensed milk and reducing the sugar to 5 tbsp. Everybody loved the cake and were thrilled to know if was eggless, especially my aunts who are staunch vegetarians. Here is a pic from the celebrations. 


until next time,


Did you like what you just read. then Subscribe to Cooking With Siri feed  (OR)

Enter your email address and Never miss a post..


Delivered by FeedBurner

Be the first one to know what I am going to post next by "Liking" Cooking With Siri page on Facebook and follow me on twitter.


July 9, 2012

A trip to Goa and {Recipe} Basic Vanilla Cookie Dough + Cut-Out (Star) Cookies

 
Would you believe if I said we hardly vacationed anywhere since past few months. Blame it on work, health, or simply lack of opportunity and when we did get one to tag along with my sister & her husband, we just jumped on it. Hence this quick 2-day trip to Goa.

If you are a sun-soaking-beach-loving person or hate monsoons, then July/August is not the time to visit Goa. But if you are in for some sporadic rainfall, lush greenery and lovely breeze all around, then this is the right place at the right time. The experience would be completely different during summer season when the beaches, malls, flea markets are buzzing (read as crowded) with tourists. Now, Goa is a hidden gem - serene and quaint.

Here are some pictures from our trip.


a quaint corner of a cafe where we had our lunch

lush greenery all around --> That's Goa in monsoons.

the very famous Mangueshi Temple, Goa


enjoying the monsoons..
Once back home, the baking bug caught me during the weekend and quickly baked some cookies using Martha Stewart's Basic Vanilla Cookie Dough recipe which I bookmarked a very long time ago. This recipe is so versatile and can be used as base for countless varieties of cookies. Just a make a batch and then refrigerate or freeze. Cut a piece of cookie dough when you want to crave some and save the rest. How cool is that.

Today I made some Cut-Out cookies using the dough. Just roll, cut, sprinkle, bake and eat! :-)

Cut-Out (Star) Cookies. Any pretext to make these today is a valid excuse! :P

Butter + Sugar --> Creamed until pale & fluffy

Cookie Dough versatile enough to make various kinds of cookies. I will share a few in coming posts.

It's time to get creative and use this master dough to make any shape or colour of cookies, perfect for any occasion

Just out of the oven..

{Recipe}  Basic Vanilla Cookie Dough 

Adapted from Martha Stewart

~ Makes around 60 star cookies

Ingredients


3 cups all-purpose flour
3/4 teaspoon baking powder
1/2 teaspoon salt
1 cup (2 sticks) unsalted butter, softened
1 cup granulated sugar (or 1 3/4 cup of powdered sugar)
1 large egg
2 teaspoons vanilla extract

Note: If using salted butter, omit salt from the ingredients list. But, I personally prefer unsalted butter as the salted version has an after taste which is not-so-pleasant to the taste buds.


Preparation:

1. On a wax paper or in a bowl, mix together flour, baking powder and salt. Keep aside.

2. Beat butter and sugar with an electric mixer on medium speed until pale and fluffy. If using a whisk to cream then use powdered sugar for easy, smoother dough. Scrap with a spatula as you go. Beat in egg and vanilla on a low speed. Add flour 1/2 cup each time and beat until combined. If the dough is dry, then add few tablespoons of milk.

3. Divide into two portions and wrap each of the cookie dough ball in plastic wrap or wax paper and refrigerate for atleast an hour. The dough will stay good for 3 days when refrigerated. When kept frozen, the dough is good for 1-2 months. Cut out the needed amount of dough and thaw in the refrigerator overnight in case of frozen dough.

Making of Cut-Out (Star) Cookies

1. Preheat oven to 190 C or 375 F.

2. On a lightly floured surface, roll out dough into a disc of 1/8- to 1/4-inch thickness. Using a cookie cutter, cut out cookies into desired shapes and line them up on a parchment or wax paper. Refrigerate the cookies (before baking) for 15-20 mins until firm.

3. Sprinkle some chocolate strands on the top and bake for 8-12 minutes or until light golden brown. Keep an eye on the cookies after then 8-minute mark. Cool them on a wire wrack.

Serve and save the rest in an air tight container which will stay fresh for at least a week.

Enjoy!

Since its the first recipe with this dough, I have kept it simple using chocolate strands as the topping.

*******************************

Who said food can't look good in monochrome? :-). Sending the below picture as an entry to Black and White Wednesdays 40 guested hosted by Anusha, original concept by Susan.


until next time,


June 17, 2012

Chocolate Coffee Almond Blondies with a glass of milk!


"The future, seems to me no unified dream but a mince pie, long in the baking, never quite done." 
~ Edward Young


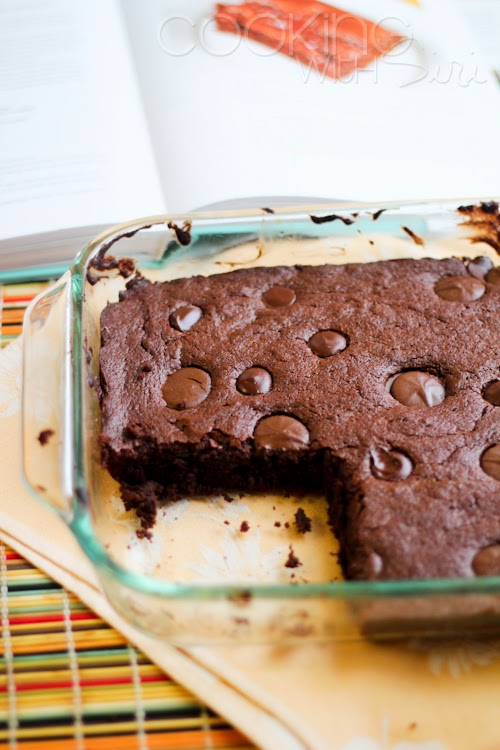
Chocolate Coffee Almond Blondies served with a glass of milk!

When I published my last post, it was blistering hot outside and I was devouring greedily on juicy, pulpy mangoes, making all kinds of desserts with them. As I write this post, it is raining cats & dogs, a weather perfect for spicy pakoras with ketchup in one hand and hot chocolate in the other. Never thought this would be month-long break. As I said on my facebook page, I was just stuck in a cobweb of mundane activities which needed my attention, took most of my time and energy. Hence the lull in my blogging. Thanks for inquiring and writing to me. :-)

"Chocolate is not cheating! After a salty meal, you need a little bit of sweet. This is living, not cheating" ~ Ali Landry
...but I was reading a lot. It first started with breathtaking story of Mariam & Laila in A Thousand Splendid Suns, then got to know about workholic lawyer Samantha Sweeting as The Undomestic Goddess, then read how Lord Shiva took a human form and set out to destroy evil, uncovering deadly secrets along the way in very popular Shiva Triology (both The Immortals of Meluha and The Secret of Nagas), next came Day of Honey, a memoir of food, love and war - which opened up a whole new world of people, their cuisine, their culture in Middle East and most recently The Thirteen Tale, a tale of twins, Adeline and Emmeline. Till date, I never enjoyed reading such diverse set of authors who in their own right and might weaved magic through words portraying sublime emotions which will stay with you - forever!.

Chocolate, Coffee, Almonds, Brown Sugar - a divine combination of flavors!
Honestly, Baking is not something that appeals to me greatly. I am no Rachel Ray, mind you who can't bake at all. It's just that baking asks for exact measurements, which puts me off, personally speaking. I bake only when I crave for something that's not available in the bakeries around me (sadly after moving to Hyderabad, I hardly get any delicious baked goodies I want, so don't be surprised if I start to bake regularly from on. ;-)).

I bake out of absolute necessity, with simple, not involving any fancy, hard-to-get ingredients. Like today's "Chocolate Coffee Almond Blondies", a one bowl recipe which is super easy to put together.

just out of the oven...
{Recipe} Chocolate Coffee Almond Blondies

Adapted from Seattle Times

Makes ~ 10 servings

Ingredients:


1 tablespoon water
1 tablespoon instant coffee (I used Sunrise brand)
1 teaspoon vanilla extract
1/2 cup (1 stick) unsalted butter, softened at room temperature (If you are using salted butter like Amul, omit adding salt below)
1 cup packed brown sugar
1 teaspoon salt
2 eggs
1.5 cups all-purpose flour
1 cup chopped milk chocolate bits (chop chocolate bar into small bits using a sharp knife)
1 cup almond bits (optionally use chopped/slivered almonds if desired)
1/4 cup chopped almonds (for topping - optional)


Preparation:

1. Heat the oven to 350 F or 180 C. Grease a 9 inch round or square baking pan with cooking spray or butter.

2. In a mixing bowl, combine the water, instant coffee and vanilla extract. Stir until the coffee granules dissolve. Add the softened butter, brown sugar and salt (if using unsalted butter). Using an electric mixer or whisk (+ a lot of muscle power), beat until light and fluffy. Add eggs, one at a time, beating between additions and scraping down the sides of the bowl. Stir in the flour, then the chocolate and almond bits.

 3. Spread the mixture evenly into the prepared pan with a spatula. Top with some chopped almonds. Bake for 35 to 40 minutes (check after 25 minutes), or until a toothpick inserted at the center comes out clean. Cool and Cut into 10 pieces. Serve as-is or with glass of milk on the side.!

Notes -

1. To make almond bits, just pulse them in a grinder for 3-4 seconds. Any kind of nuts - cashews, peanuts or walnuts work well with this recipe. May be you would like to add a bit of each.

2. Every oven works differently. So, I would suggest to check for doneness after 25 minute-mark.

3. If the batter is too dry, add few tablespoons of milk.

4. Sprinkle flaked sea salt, if desired before popping into the oven for a salty note.

5. These blondies taste great the next day as well. Cut and store in an air tight container.

infinitely adaptable, blondies are so easy to make. tastes best even the next day. perfect for potlucks, picnics etc.
 *********************************************************************************

...and here is a photograph I clicked while we were at Big Dosa here in Hyderabad. Sending it to Aparna for  Black and White Wednesday # 37, originally conceptualized by Susan. Click here to view my other B&W submissions.

taken at Big Dosa, Hyderabad
Have a splendid week ahead folks.

until next time, Bon Appetit,


August 2, 2011

Cornmeal Orange Cookies

July 2011 has passed and it is time for some free-spirit-blogging again. Would you believe that it is already the 4th edition and by each theme, it is getting challenging and am enjoying it more and more.

For the month of July, it was Lata ji who chose the theme and she had a list of 12 choices and each one of us had to choose a number from 1-12. Each number was associated with a hidden ingredient & an add-on flavor.

I chose No. 10. Want to know what were the other choices. Below is the complete list. Some will make your wonder, some will make you wrack your brains and some were like, just a big WOW. Check out for yourself -

1. Bottle gourd/ Marrow/ Zucchini (Cinnamon/Cardamom flavouring)
2. Tapioca/ Arrowroot starch (Zest of lemon or Orange/Juice)
3. Tomatoes (Vanilla)
4. Barley (Coffee/ fruit)
5. Quinoa (Raisins, fruit juice)
6. Noodles/ Pasta (Dark chocolate)
7. Buckwheat (Cheese/paneer)
8. Sweet peppers (Nuts and dry fruits)
9. Sweet corn (Cream)
10.Corn meal/ Polenta (Coffee/Orange)
11.Black currants/ Pomegranates (Caramel/White Chocolate)
12.Chick peas or mung beans (saffron/ pistachios)

Didn't I say - you will be surprised by some of the combinations ;-). Now, the part of the deal is to make a dessert out the allotted ingredient preferably with the add-on flavors specified on the side. I chose Orange and made some yummy Cornmeal Orange Cookies for the FSB challenge.


You know whats the first thing I got reminded of as soon as I took a whiff of the cookie dough - the little Orange cream biscuits which I used to practically live on, when I was a child. I never knew Orange oil would give such nice fragrance and flavor to the cookies. :-)


Cornmeal Orange Cookies


Adapted from Dorie's recipe of Cornmeal Shortbread Cookies and some inputs from Mads

Ingredients:

* Yellow Cornmeal (fine) - 1.5 cups
* All purpose Flour/Maida - 1/2 cup
* Cornstarch - 1/4 cup
* Butter - 1 cup
* Sugar - 2/3 cup
* Salt - 1/2 tsp
* Orange zest - 2 tsps
* Orange essence/oil - 1/2 tsp
* Vanilla - 2 tsps

Procedure:

Step 1: Sift the flour, cornstarch, cornmeal and salt. Set aside.

Step 2: Working in a bowl, rub the sugar and zest together with your fingertips until the sugar is moist and fragrant.

Step 3: Cream butter and sugar together with the vanilla, about 3 minutes.

Step 4: Reduce mixer speed to low and tip in the dry ingredient mixture, mixing only until the flour streaks have disappeared into the dough (do not over-mix).

Step 5:  Using a rubber spatula, transfer the dough (which will be soft and sticky) onto a large piece of clingwrap. Wrap neatly and transfer dough to the refrigerator for at least 2 hours. 


Step 6:  Towards the end of the refrigeration period, pre-heat the oven to 180°C/350°F.

Step 7:  Line your cookie sheets with parchment paper, else grease them. If using non-stick bake-ware, lining or greasing them will not be necessary.

Step 8: Using a cookie scoop or a greased tablespoon, drop the refrigerated cookie dough two-inches apart, on the readied cookie sheet. Don’t worry about the dough being of irregular shapes as you drop it on the cookie sheet. The cookies will even out as they bake due to the fat spreading from the heat.

Step 9:  Lower the temperature to 150°C/300°F and bake the cookies for 20-25 minutes or until they just start to turn golden brown on the edges. They will continue to cook even after you’ve removed them from the oven, so please don’t be fooled to think that they’re under-baked.

Step 10: Remove cookie sheet from the oven and let the cookies sit on the sheet for a couple minutes before you gently move them with a thin spatula to a wire-rack, to cool completely.


Variation: Break the cookie into crumbles and top it with Vanilla Ice cream. It is pure heaven. :-)

Previous FSB challenges:

May 2011 - Mysore Bajji/Mysore Bonda
June 2011 - Vegetarian Rogan Josh

Here is what other FSB members made for the month of July -

Anu - Yet to post
Deepti - Yet to post


until next time,
Siri
 
Related Posts Plugin for WordPress, Blogger...